Vector & Bitmap Image Guide
6-minute video
Vectorizing with Adobe Illustrator
Many of the machines in the DAMLab deal with image files: the printers, vinyl cutter and embroidery machine to name a few. However, since each of the machines works differently, they require different types of image files. There are two major types of image file, vector and bitmap images. Vectors are usually in .SVG and .AI file formats, while bitmap images are more "usual" file types, such as .JPG, .GIF, .PNG, etc.
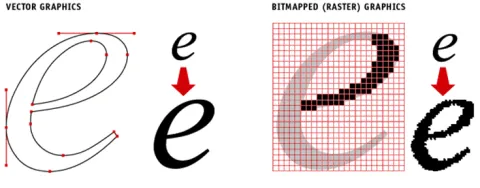
The difference between the two image types is that bitmap images are made up of pixels, and vector files are made up of lines described by equations. This means that as you zoom in on a bitmap image it will become “grainy” while a vector file will stay smooth and sharp.
Converting vector to bitmap
Converting vector to bitmap is fairly straightforward. The easiest way is to open your .SVG or .AI file in Adobe Illustrator and export to the .PNG file format:
Begin by opening your file in Adobe Illustrator. Delete anything in the file that you don't want to be in the final image (if you want to keep other parts of the file, use File -> Save As to save a copy before you delete).
Use Ctrl+A or Select>All to select all the remaining objects in your design.
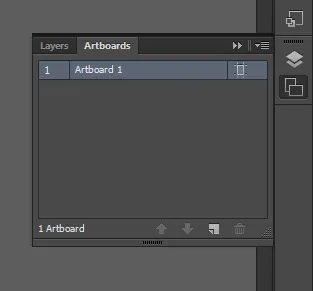
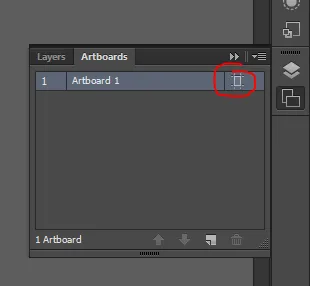
Go to Window -> Artboards. You should see a window labeled Artboards pop up on the right side of your screen.
Click Crop button in the Artboards window.
Use the presets drop down to select Fit to Artwork Bounds.

Go to File -> Export.

Select the .PNG file format and an appropriate location for your file. Then click OK.
In the PNG Options window that pops up, set the Resolution drop down box to Other and type in 600 in the text box next to ppi.
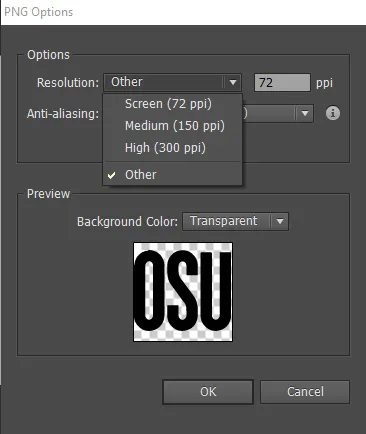
Select OK.
The export process may take a few seconds to a few minutes. After it completes, your new .PNG file should be in the location you selected.
Converting bitmap to vector
Converting from bitmap file to vector file is not as simple as the reverse. This is because the bitmap file doesn't know how to scale without getting grainy the way a vector file can. We can use Adobe Illustrator to "trace" a bitmap to get a vector image, but certain types of image trace better than others. Photographs and very complex patterns often trace very poorly, while simple images with large solid-color areas trace exceptionally well. To trace an image:
Open Adobe Illustrator and use File -> Open to open your bitmap file.
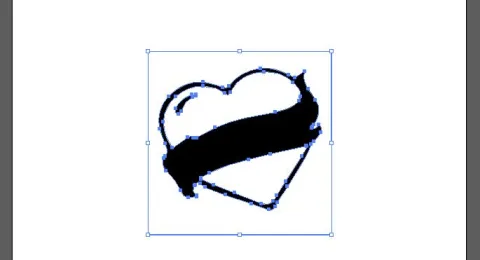
You should see the image appear in the Illustrator window. Click on it to select it, then go to Object -> Image Trace -> Make and Expand. At this point, you should see the traced version of your image appear.
(OPTIONAL) If your image didn't trace the way you wanted, you can use advanced options (TODO)
Now, your image probably has white areas that you may or may not want. If using the vinyl cutter or laser cutter, you should certainly remove them. if using the embroidery machine, you may want to leave them, if you plan to embroider using white thread in those areas. If you want to keep the white, go to File -> Save to save your .AI vector file, and you are done.
Right-click your traced image and select Ungroup.
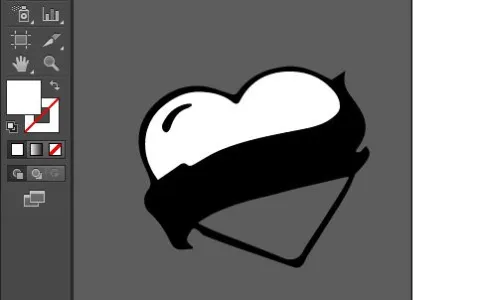
To see where you might have white objects, click and drag to move your traced design to the dark grey area of the screen. Now you can easily tell the white objects from the transparent areas. To remove them, simply click on the white objects and press Delete to remove them.
Finally, use File -> Save to save your new vector image. If you need a .SVG file instead of the usual .AI, be sure to select the .SVG option from the file type drop down box in the Save window.